Thirteen Acres is supported by our readers. When you buy through links on our site, we may earn an affiliate commission. As an Amazon Associate, we earn from qualifying purchases.
When we started building our house, the plans included a built-in desk for the office. We had every intention of letting our builder do it, but as our build time dragged out due to the world shutting down, we started to cut things we could do ourselves from the build. To help speed things up and let us get into our new house (and also reduce initial cost a little bit), we decided to take these built-ins off our builder's plate.
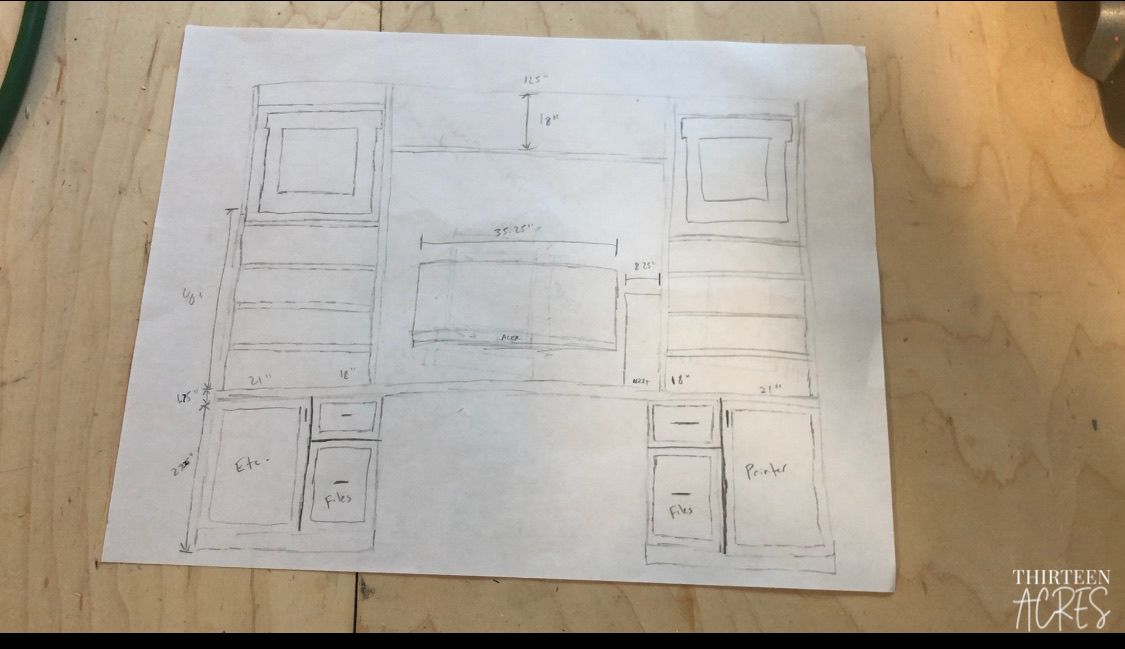
Although it meant more work for us, I'm really happy I ended up building the desk myself. Since I was working in the room most days, I'd spend time measuring different areas and drawing up sketches of my plan at lunch to try and come up with the best use of space. By taking on the work ourselves, it also made it possible to consider my ultra-wide monitor and make sure it would fit between the two bookcases. Creating symmetry and working the windows into the design was also important to me, to make sure it didn't look weird or make the windows useless.
While planning to build the desk, I came up with a list of things I wanted it to include, and tried to incorporate them into the design:
- A file cabinet - We have lots of random documents, so I knew I wanted a large drawer to store all of them.
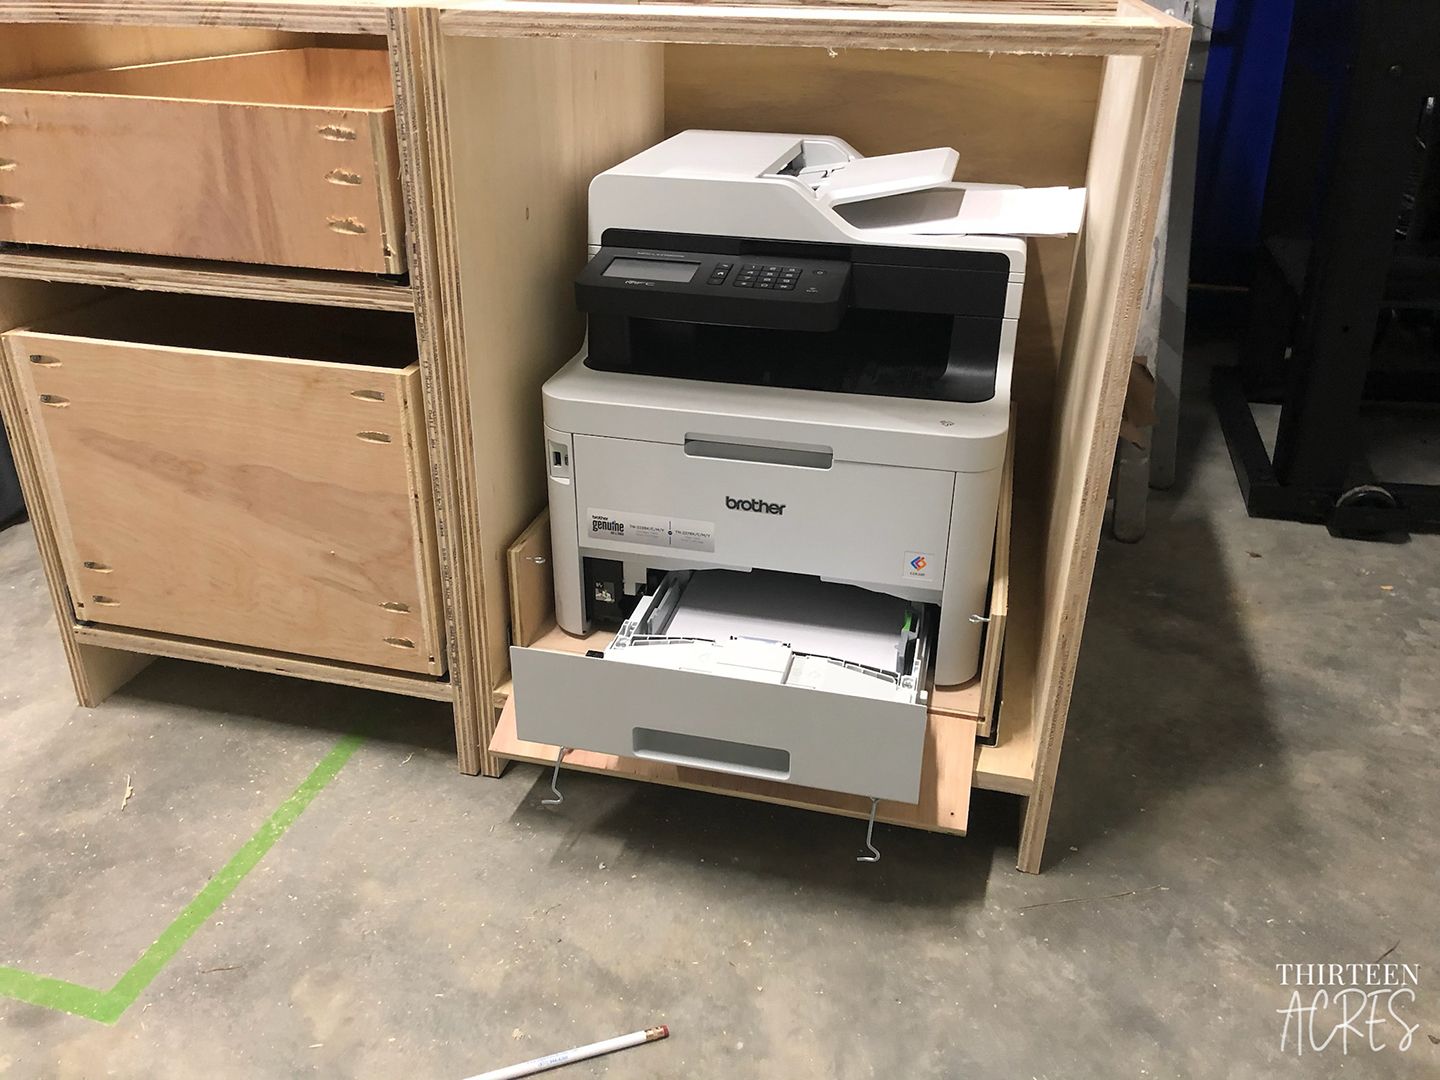
- A printer storage solution - We have a pretty large laser printer, and I wanted a good place for it - we don't use it that frequently so I wanted to hide it somewhere that could be accessed when needed.
- A display area for some shoes - This wasn't a necessity, but I was really hoping to have a nice display area for some of my favorite shoes. I also thought about including some LED strip lights to display them even more prominently.
- Room for my existing monitor - It took me a long time to find my perfect monitor. I hate cables, so when I found this one that is essentially the same size as two 24" monitors and also uses only a single cable to provide power to my MacBook pro and connect my monitor, I had to have it. I really wanted to be able to fit it into the design.
- Space for my favorite poster - I bought a poster that has one of my favorite quotes on it years ago, and I've never had a proper place to hang it. I wanted to include a space for it to finally be able to put it up.
- Plenty of space for books - I have quite a few programming books, and wanted room to expand.
Obviously, the list of wants I came up with was very unique to the problems I had experienced with my prior desk. Many ideas also came from spending time in the room and understanding the space that I had at my disposal, allowing me to visualize ideas I could fit into the project.
This is why I'm happy that we ended up holding back on asking our builder to complete the built-ins. It's not that they couldn't have done it, but they didn't live in the space for months before figuring out the problems and the solutions. I didn't even know any of these things either, so I couldn't have provided much guidance.
In the end, the actual solution doesn't seem like much when you break it down. It's 4 cabinets, 4 bookcase sides, 6 shelves, and some trim work to install the lighting. Finally, the shoe display shelf was added in last, to complete my requirements.
Cabinets are actually pretty straight-forward to build - they're just a box. I've made quite a few cabinets myself, it was actually the first larger project we did in our previous house, too. However, this was the first time I've built frameless cabinets, so that introduced a bit of a learning curve - though now that I've got it figured out, it's probably the easiest style of cabinet I've built. In the past, I had mostly built framed cabinets, many of them with inset doors, which are significantly less forgiving when you make a small mistake.
Kreg (which I already use frequently for their pocket hole jig) and Rockler actually make jigs for many of the tasks I had to complete for this project:
- Kreg Concealed Hinge Jig
- Kreg Shelf Pin Jig
- Rockler Jig It Undermount Drilling Guide with Drawer Slide Jig
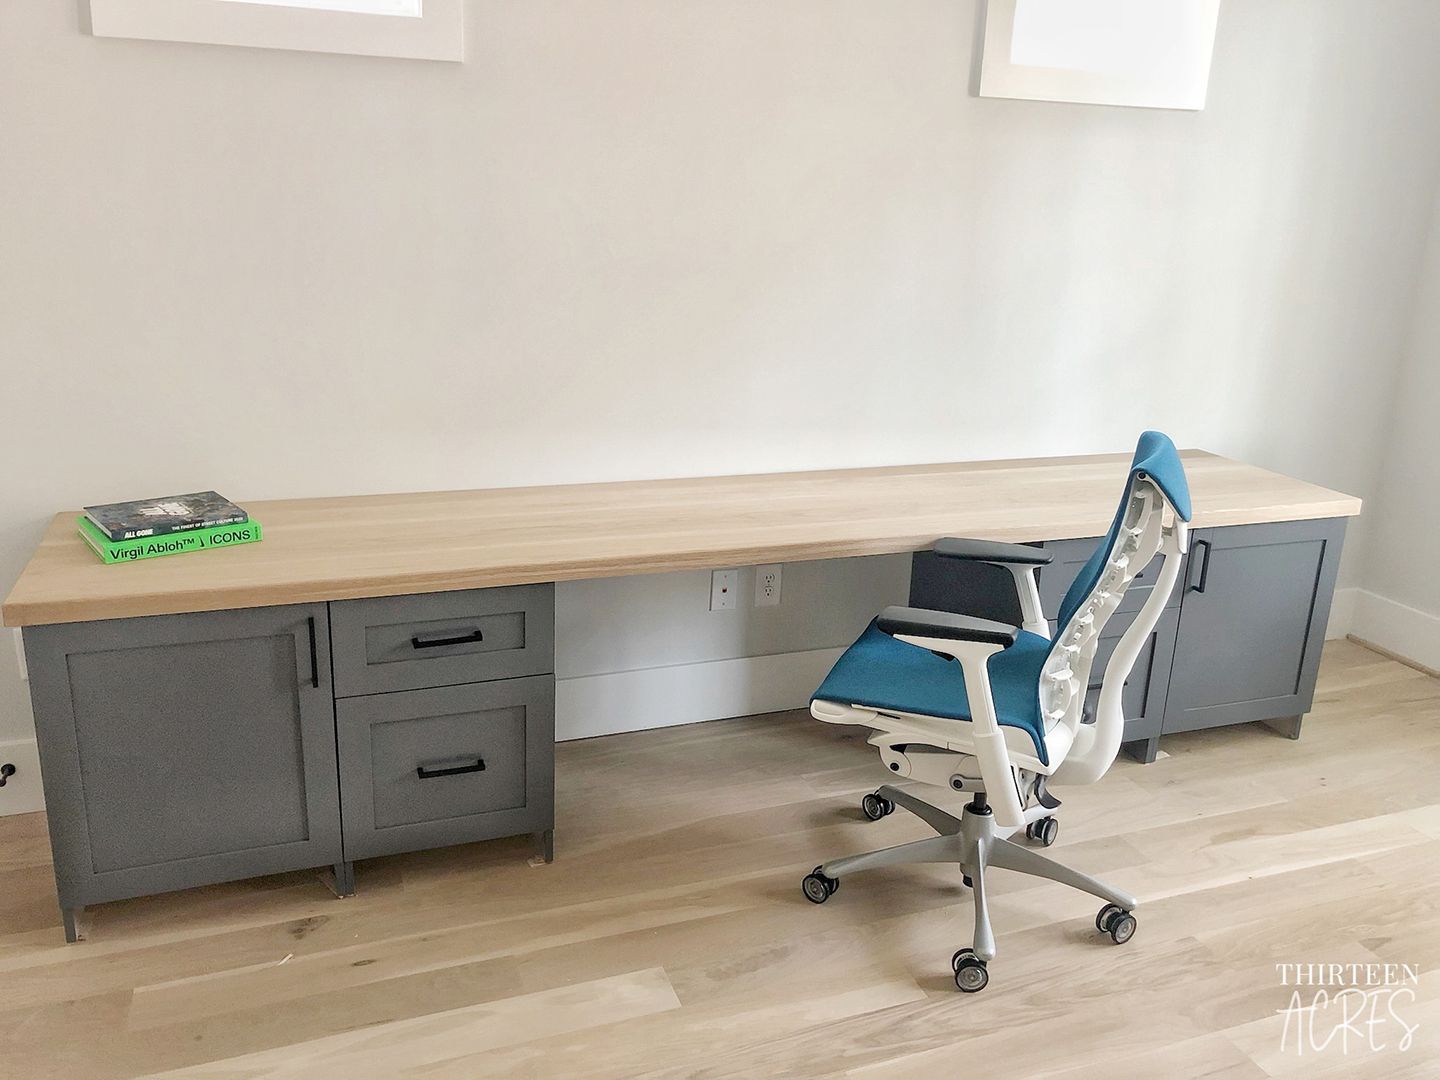
Most cabinets that are available at big box stores are meant for either bathrooms or kitchens, and most of them are going to be 34-1/2" tall. Since I built my desk custom, I wanted it to be a standard desk height, so I built them at 27-1/4" tall to account for the 1-3/4" white oak desktop I placed on top of it, for a total of 29" tall.
I started all four cabinets the same way, 3 pieces of plywood, and 2 strips of plywood at the top.
- 8 pieces of plywood down to 23-3/4" x 27-1/4" - these are the sides of all of the cabinets. I would use 24" deep, but that would end with not quite enough left on the last piece when using a sheet of plywood, so I cut slightly shorter to make sure I can get 4 pieces out of a single 8 foot sheet.
- 2 pieces of 23-3/4" x 19-1/2" for the bases of the 21" cabinets
- 2 pieces of 23-3/4" x 16-1/2" for the bases of the 18" cabinets
- 4 strips of plywood at 16-1/2" x 4"
- 4 strips of plywood at 19.5" x 4"
The strips of plywood don't have to be any specific depth, but I make sure they're big enough to get 2 pocket holes on either side. I go with about 4" to help with keeping the cabinets square as well.
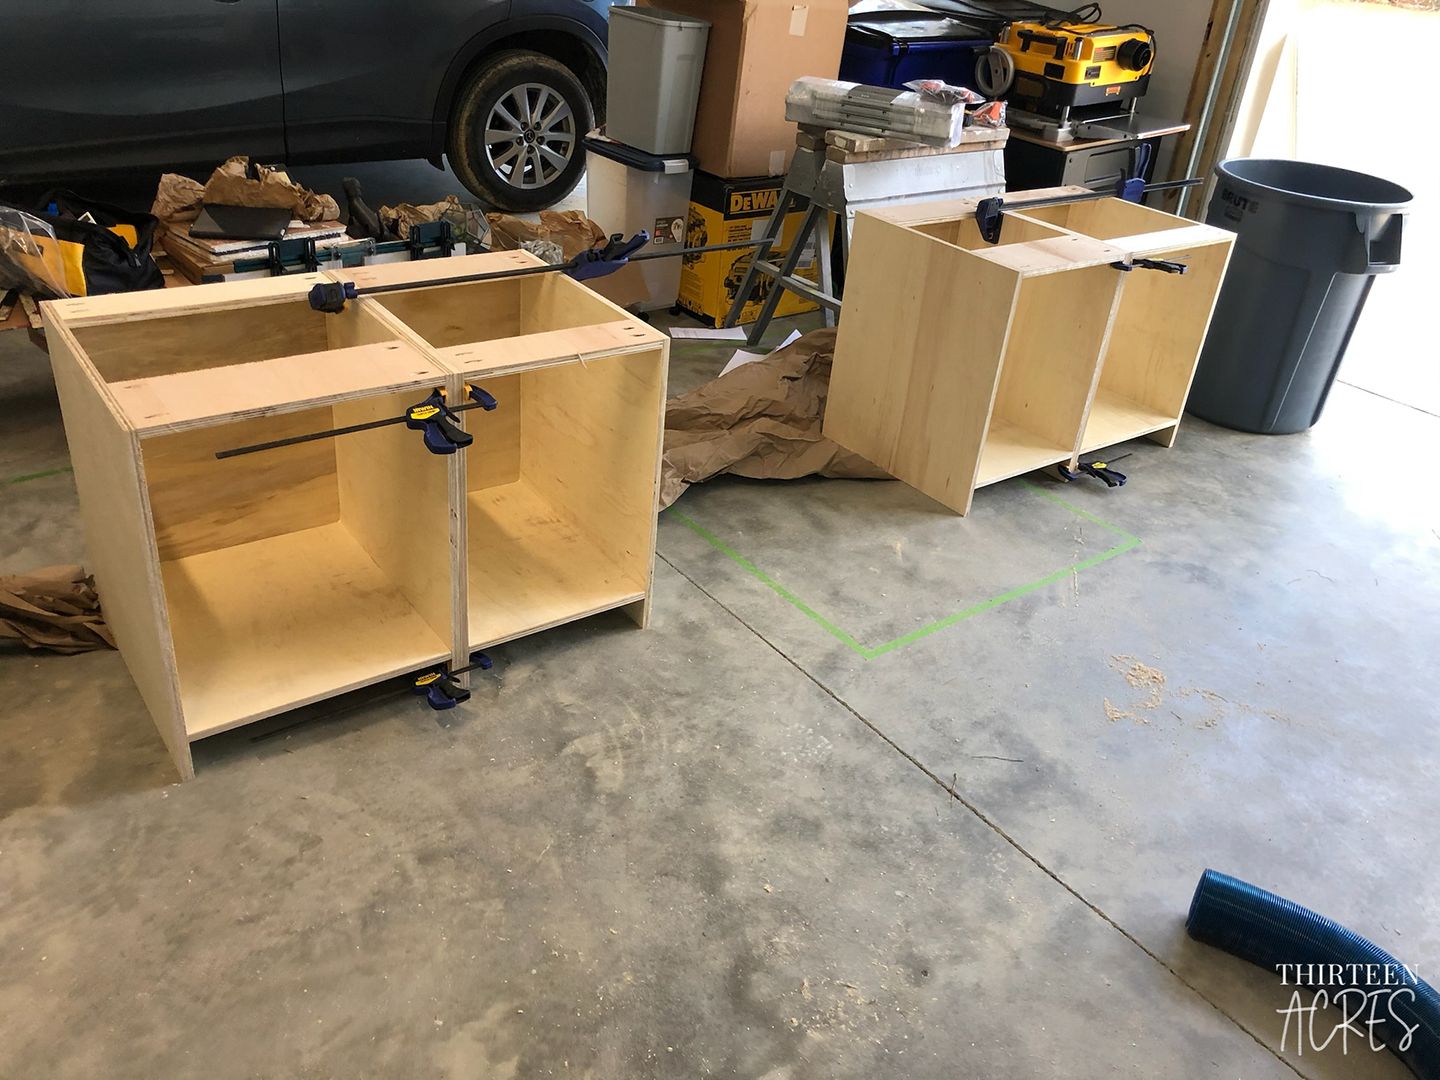
Before assembling the cabinets, I also ran the sides, base, and top rear strip of plywood over the table saw a couple of times (alternatively, it can be run through a router with a 1/4" bit, or with a proper dado blade on a table saw). I lower the blade so it only cuts about 1/4" deep. Two passes through, moving the guide by 1/8" between passes should result in a 1/4" wide slot that is 1/4" deep. I usually make this cut about 1/4" from the side, so there's a little strength in the plywood to hold the back in.
I then drilled 4 pocket holes on either long side of the "bottoms" of the cabinets (on the opposite side of the slot I cut out). Making sure that the slot on the bottom board is facing up and lines up with the slot on either side, at about 4" up either side, I clamped the bottom board between the sides. Then I screwed the bottom into both sides. It's easiest to do this with the cabinet on its side because the pocket holes will be facing down. This is so they'll never be seen once the cabinet is in place. Once that's complete, I also put a pair of pocket holes on either side of the front plywood strip, then clamp it in place with the pocket holes facing up. Once the desktop goes on, they'll be covered.
Once I determined how big the rear piece needed to be (usually about 3/8" taller and wider than the opening when the cabinet is dry fit together), I cut some 1/4" plywood to fit these slots. I added a bead of glue down the slots I cut out, and followed it by sliding the 1/4" plywood down the back side. Once in place, I drill a pair of pocket holes in the rear plywood strip (on the opposite side of the slot - slot is facing down, pocket holes facing up), slot it into place over the 1/4" plywood, clamp it, and screw it together. Once this was done for all 4, the shells of the cabinets are complete.
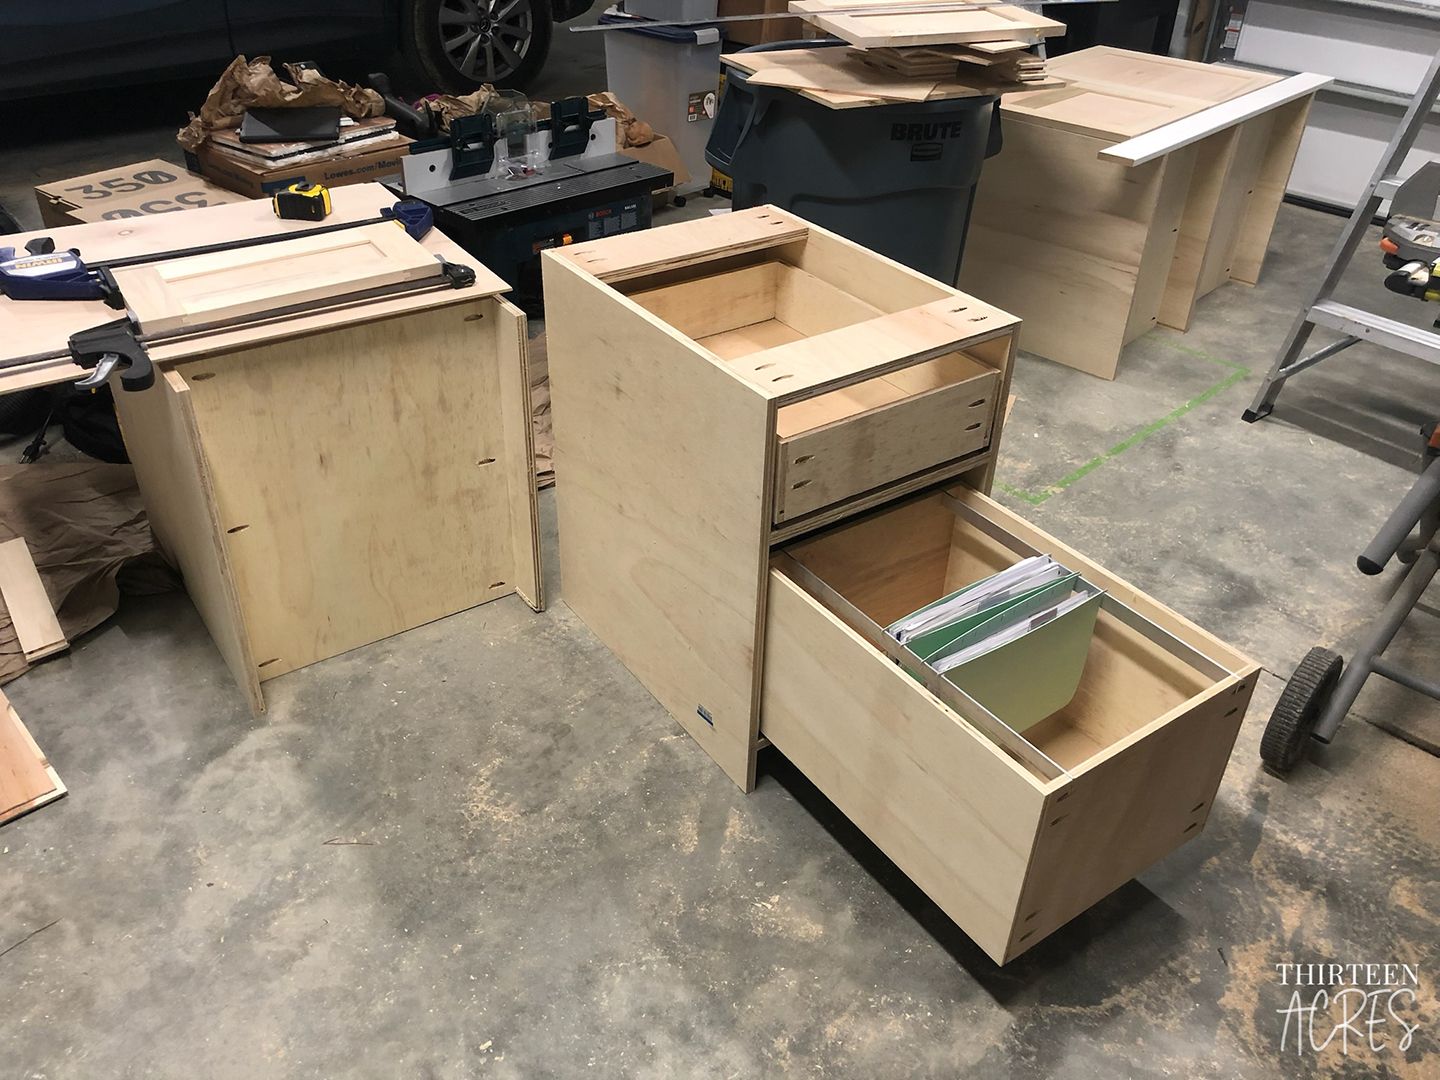
Now that the shells were complete, I began assembling drawers. These assemble similarly to the cabinets themselves, in that they are just a box. I used 1/2" plywood for the drawers to keep their weight down. I also bought 21" drawer slides, so I followed the dimensions that Blum provided for the depth and width of the drawers. They work essentially any width, but they need to have a specific amount of spacing between the side of the drawer and the inside of the cabinet, so I built the drawer to those specs.
As I mentioned in the requirements for my desk, I wanted a filing drawer. Once I assembled that drawer, I measured a filing folder to see how far apart the hangers were. Then, I cut two slots on the front of the drawer and two corresponding slots on the back. I spaced them apart so that the hooks from the hanging folders would land right in line with the slots. Then, I took a metal rail that I found at Home Depot, about 1" tall and 1/4" wide and cut it to match the length of the drawer. I created two rails using this method, and once they were the correct length, I hammered them in with a rubber mallet into the slots I cut into the top of the drawer.
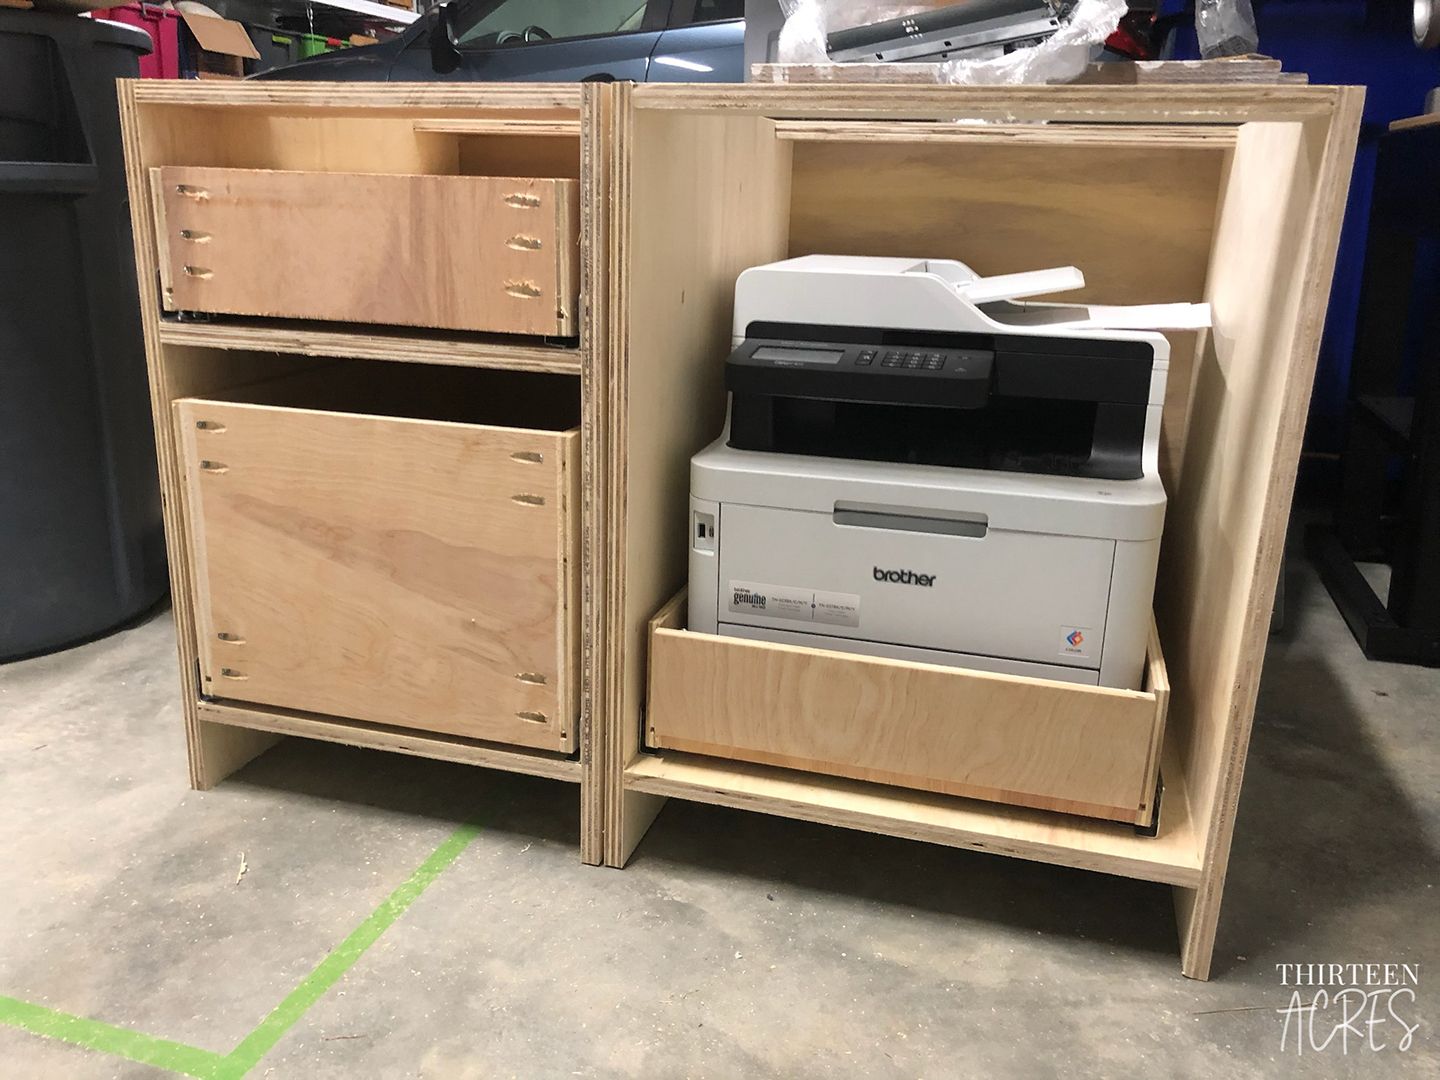
I also made a sliding drawer for inside one of the cabinets, which would serve as easy access to our printer which would live inside. I realized that, in order to load paper, the front needed to be accessible. In order to handle that situation, I added a piano hinge to the front portion of the drawer, and hooks and eyes to hold it in place when everything was closed. This probably wasn't the most elegant solution, but with how often we need to change paper, it was acceptable. I was concerned about the weight of the printer and the structural integrity of the drawer since the front piece wasn't adding any structure, so I added a rail along the bottom to help add additional support.
Using the aforementioned drawer slide jig, I mounted all of the drawers to the cabinet. I also drilled the holes to mount the concealed hinges into the door using the concealed hinge jig. Finally, after the hinges were in the doors, I struggled to get them mounted to the cabinet (Kreg actually makes a tool for this now – I don't remember if it existed at the time, but I'll be trying it out for my next cabinet project).
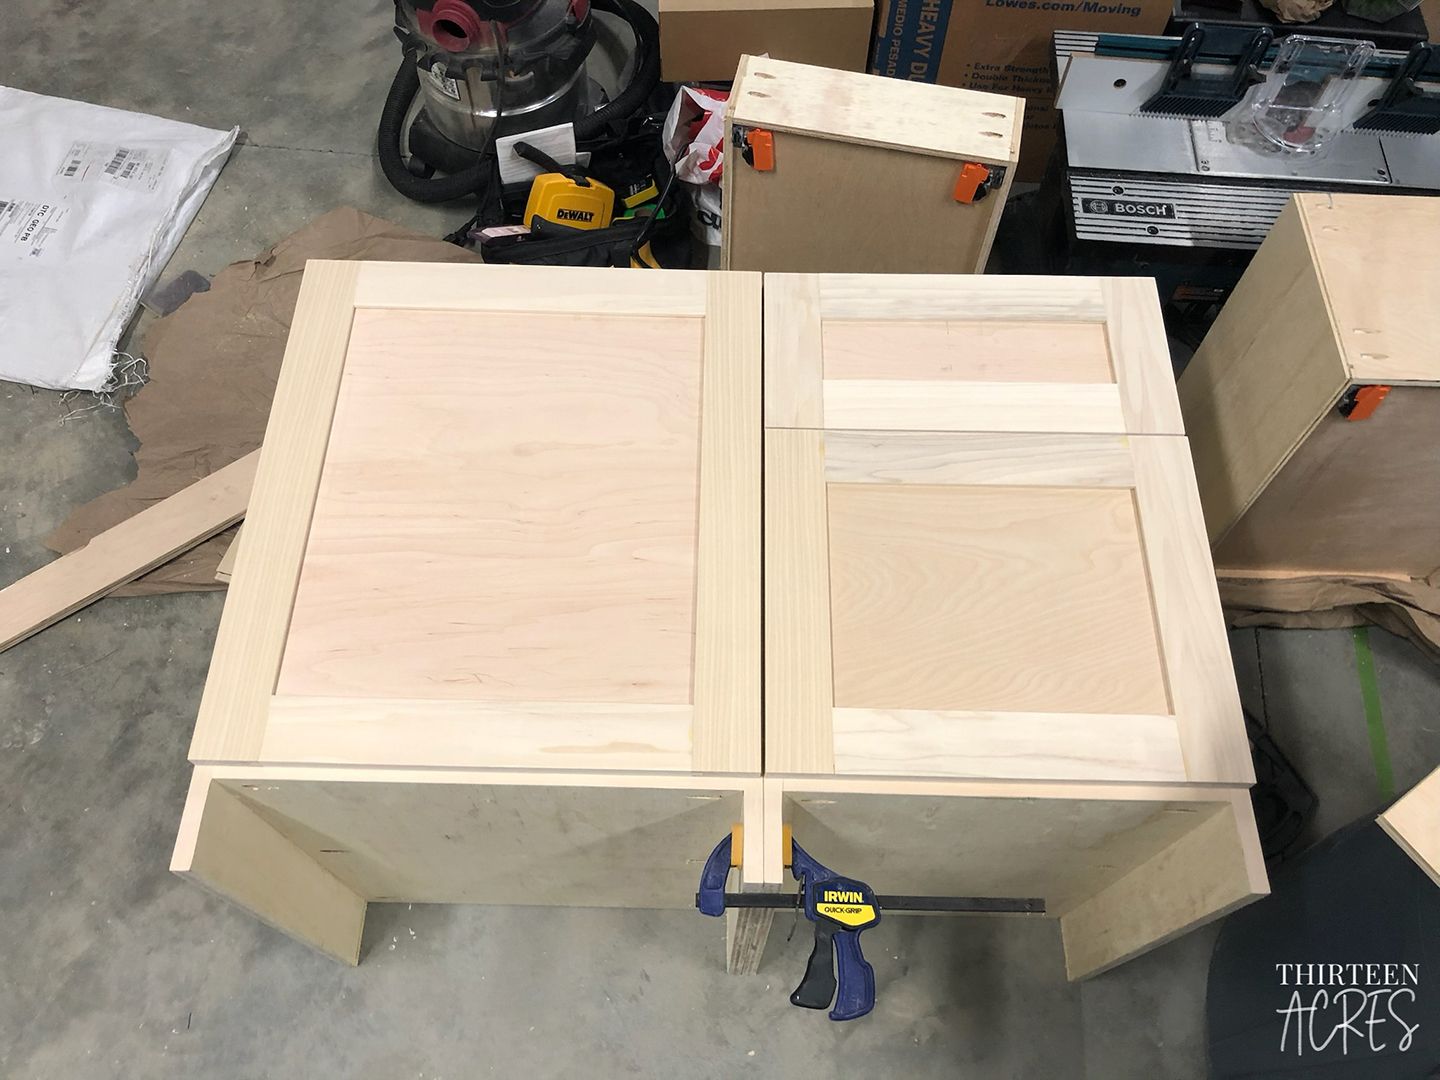
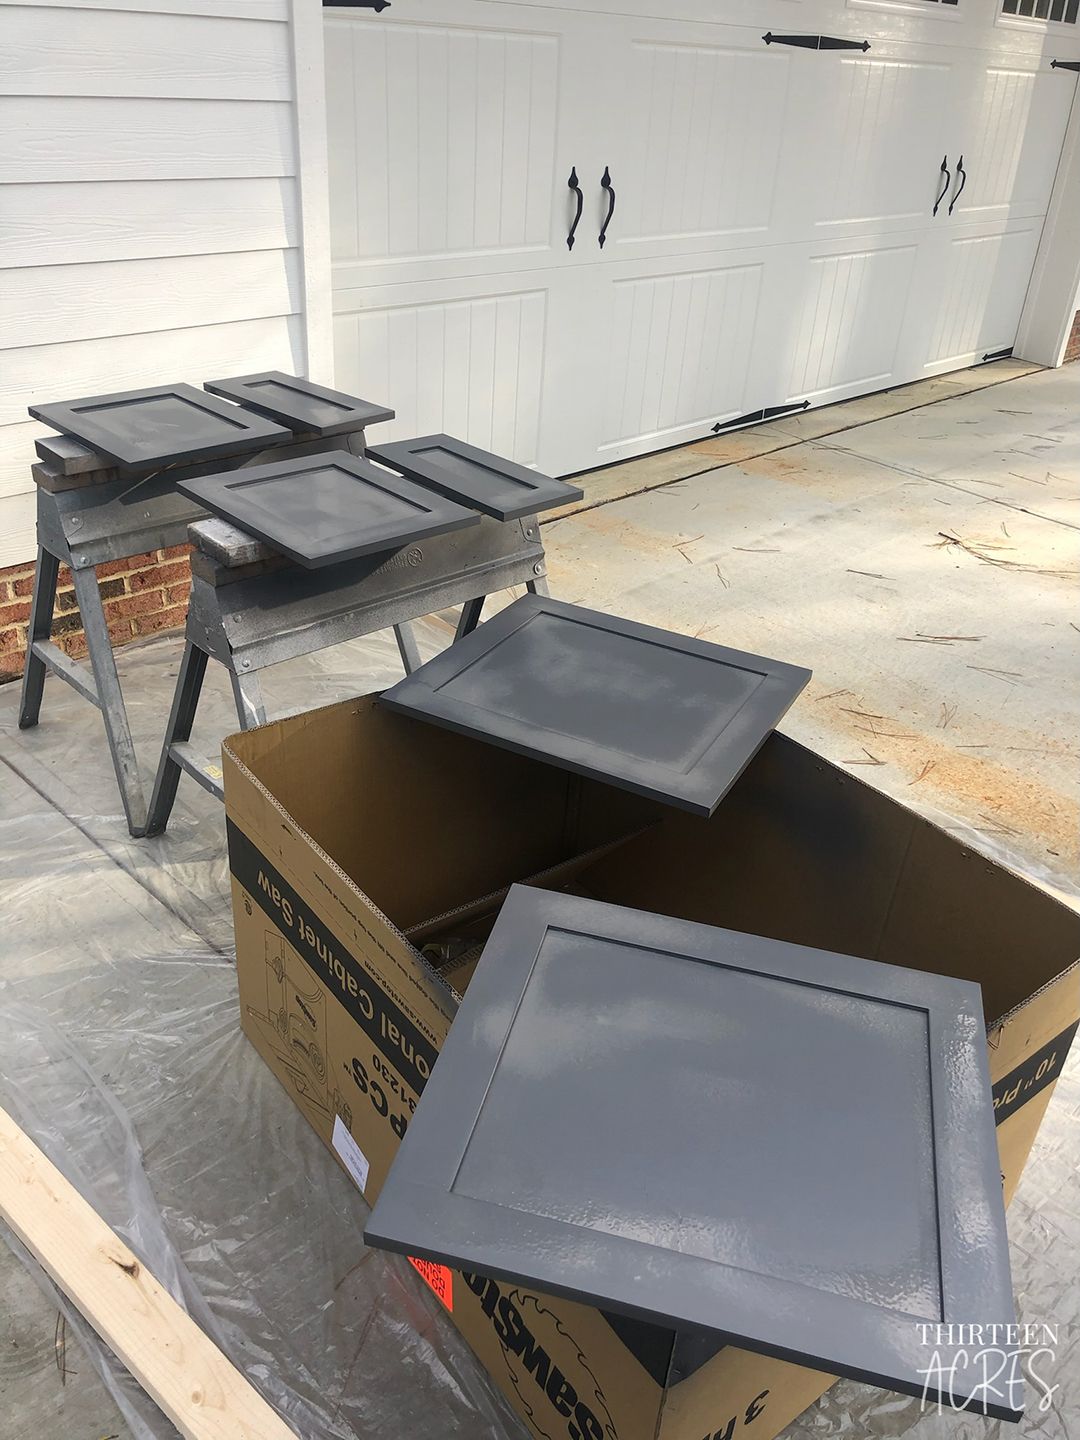
Once the drawers were complete, I could figure out door and drawer front sizes. Since these particular cabinets are full-overlay, frameless cabinets, I wanted the door to be almost the full width of the cabinet box. I measured full width and subtracted 1/4" to allow for a 1/8" gap on either side. I also measured from the top of the cabinet down to where the trim piece would reach up to, and subtracted 1/4" from that, again allowing for 1/8" gap on the top and bottom. I probably should have subtracted 3/8" or 1/2" from the top and bottom, now that I know better. The gap between the doors and baseboard was a bit tighter than I wanted once I got it all into place.
In the past, I've mostly made doors and door fronts using pocket holes, but I wanted to avoid them in this project since the pocket holes are visible when the doors or drawers are open. I got a new router table before this project, so I decided to go with tongue and groove style doors using my router's tongue and groove bits.
It took a little work to get the router all set up properly, but using tongue and groove joints worked really well. I routed a groove all the way down all four pieces. This created a 1/4" groove down the middle of each stile and rail, where I would eventually slide a piece of 1/4" plywood in between to complete the door. I also cut a tongue on either end of the rails, so that it could easily slide into the stiles on both sides. I repeated this process in various sizes for the additional door, as well as four drawer fronts, gluing and clamping after assembling the pieces.
After the doors and drawer fronts were complete - I just had to quickly add some iron-on veneer to the front edges of the plywood. I have 3/4" veneer that is pre-glued, so it was just a quick application using an iron to complete that down all the front edges.
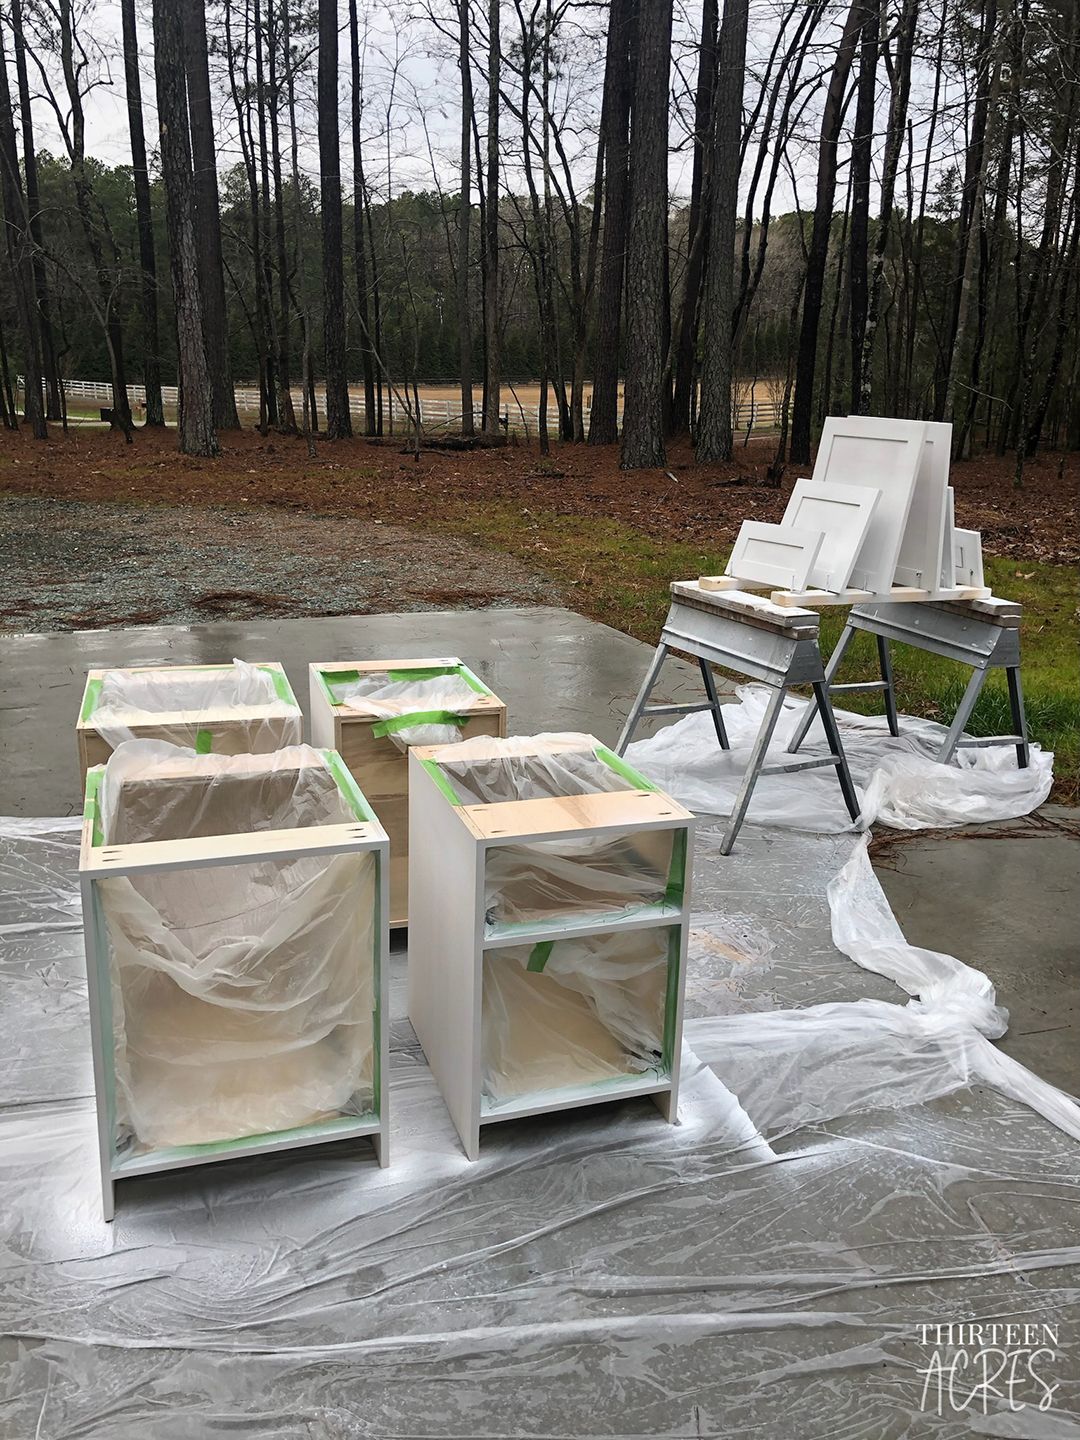
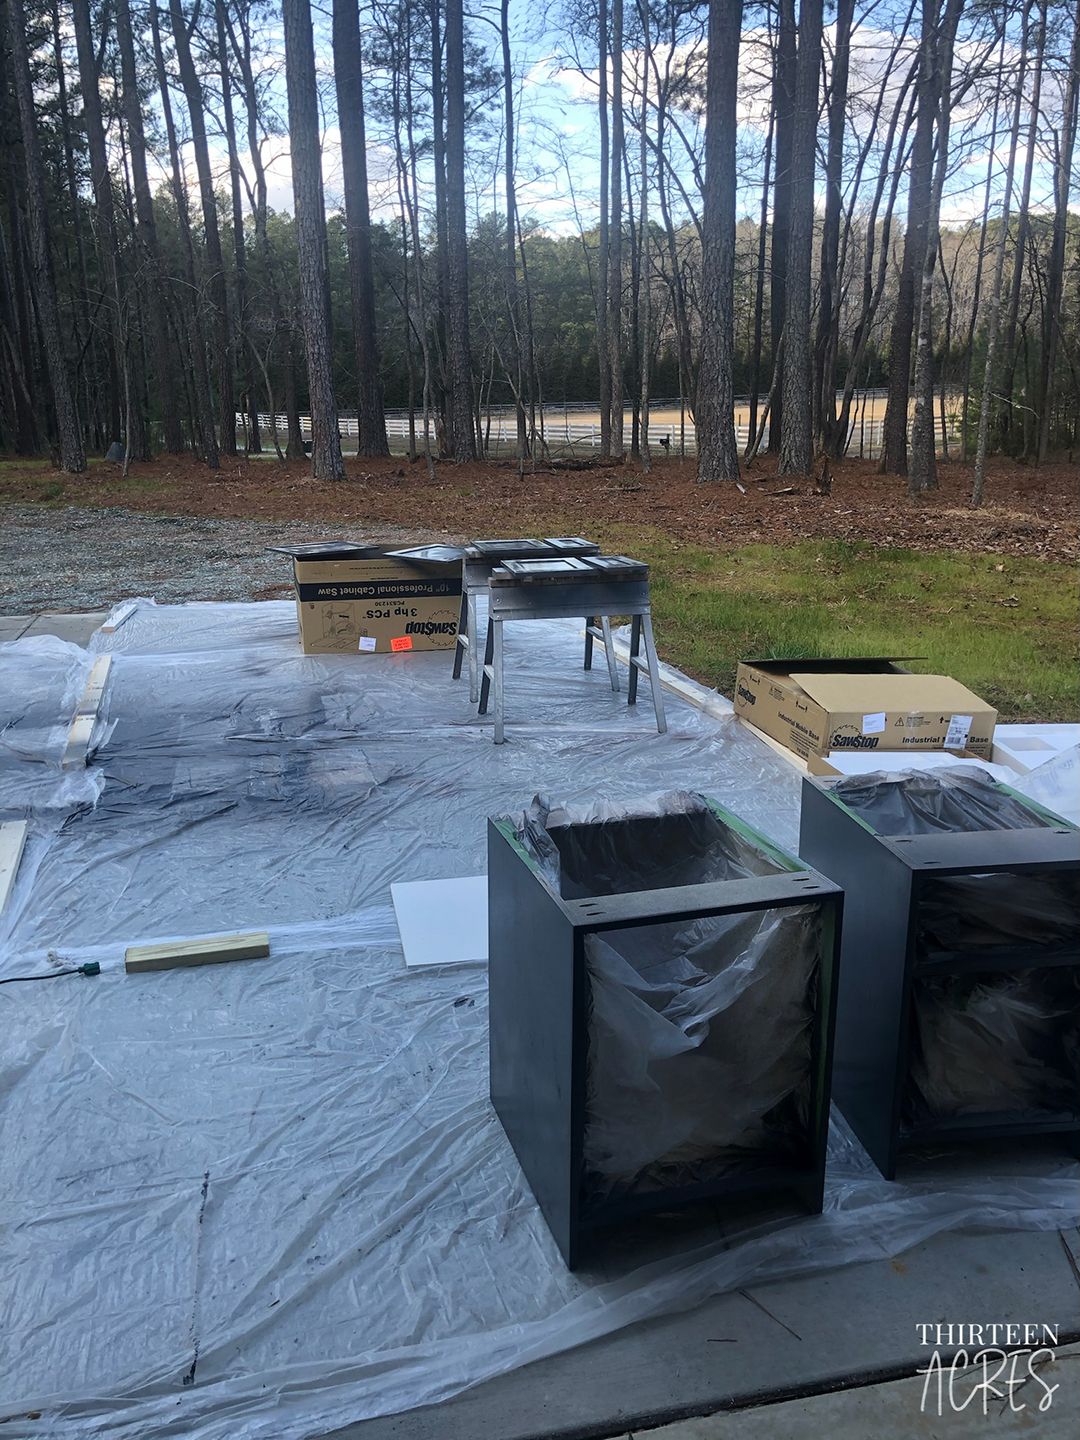
Once that was all complete, I spray painted everything, doing a coat of STIX primer first. Once the primer dried, I sanded it down with 220-grit sandpaper to get a nice, smooth surface. I followed that with two coats of Benjamin Moore Advance paint - my favorite paint for cabinets. It takes time to dry, but it dries hard which is great for cabinets.
Once this was all complete, it was time to bring the cabinets inside and introduce them to their new home. After cutting out some trim that was already in place so we could get the cabinets up against the wall, I screwed the cabinets into the wall, making it their permanent location.
Finally, we had a set of cabinets in place, and they were ready for their crown, a 128" long, 1-3/4" thick white oak countertop. It wasn't light, but I was so happy with how it looked when we carefully carried it through the front door and into the office. I attached it from the bottom with a couple of screws to keep it in place, and my desk was finally ready to get to work.
If you haven't already, be sure to follow us on Instagram, where you can check out our DIY highlight to see this build take shape.
Comments